
I’m a Technical Writer who has been using GitHub on each workday and on some weekends since August 2017. I write things now and then on several Chinese platforms such as WeChat Subscription Account (scan the QR code to follow) and Zhihu Column (click to follow).
At the end of 2018, after I got familiar with GitHub Pages, “a static site hosting service designed to host your personal, organization, or project pages directly from a GitHub repository”, and Hugo, “one of the most popular open-source static site generators”, I built a personal blog by myself.
When my husband, a Cloud Engineer, saw me creating my blog, he told me, “Chances are people seldom write new articles after the first one about how they built that blog is published.” Hmm… I won’t promise regular blog articles, but who knows? I’ll write often, maybe. At least, I’ve finished this one.
In this post, I’d like to share the specific steps that I performed to build my personal blog using GitHub Pages and Hugo. This post assumes that you are a non-technical person. It’s easy and you don’t have to know much about coding. Already dreaming of your new blog? Let’s start!
Table of Contents
Step 1: Create a GitHub repository
Create a GitHub account.
- If you already have one, sign in and skip to the next step.
- If you don’t have one, go to GitHub, sign up an account and sign in.
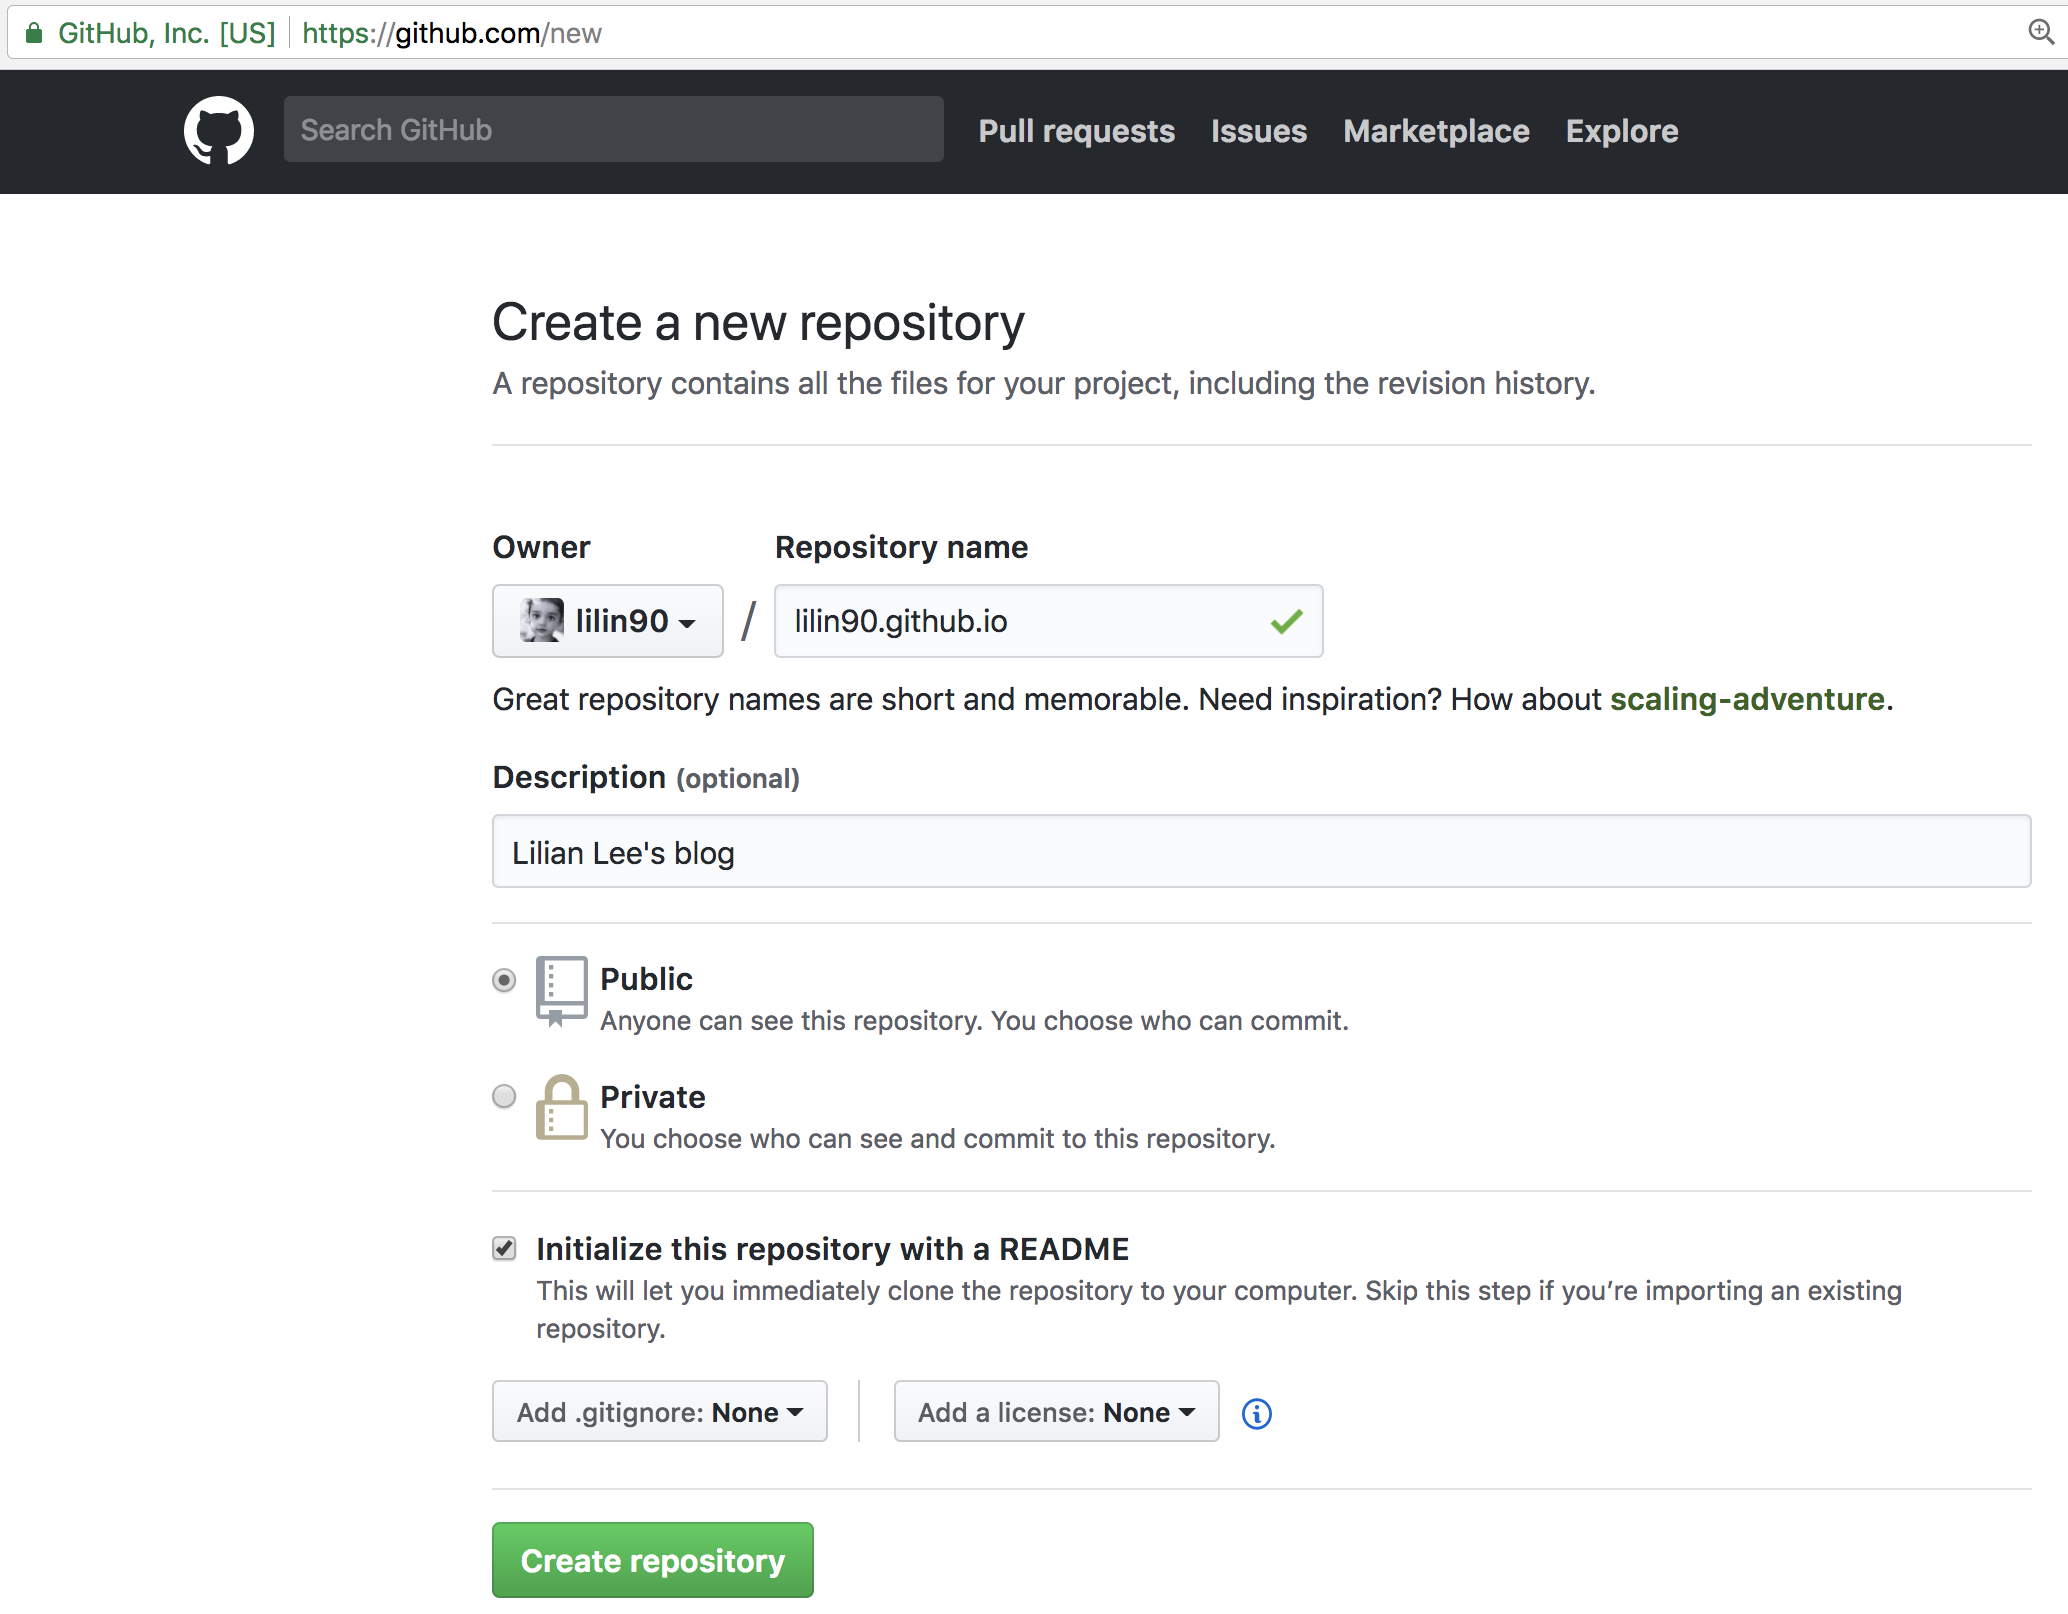
Go to GitHub Pages, refer to the easy-to-use guide for
User or organization site.Create a new repository named username.github.io, where username is your username on GitHub.
Step 2: Install Hugo
Refer to the official Hugo installation guide and get prepared.
Get a basic knowledge and install the necessary tool (such as Homebrew for macOS) for your operating system if you lack.
If you still feel confused, read the latter part of this installation guide for detailed explanations about installing on macOS and Windows. In this post, I use macOS.
Open a Terminal and run the corresponding command for your operating system.
It’s easy and you might only need to run a single line of command. Since I have already been using the package manager Homebrew on my macOS, I only need to run the following command, and then Hugo is successfully installed.
brew install hugoAfter installation, run the following command to verify that hugo runs correctly.
hugo version
Step 3: Create a new Hugo site
Go to the directory where you want to place the Hugo site folder.
Here I just put it in my macOS home directory.
You can also put it in another directory using the
cdcommand. For example, on macOS, if you want to put this folder in theDocumentsdirectory, you can run thecd ~/Documentscommand.Run the following command to create a new Hugo site.
hugo new site lilian-blog # "lilian-blog" is my site folder name.
Step 4: Choose a Hugo theme and clone it to a local directory
Go to the Hugo Themes page and choose one theme for your site.
Take the Tranquilpeak theme as an example in the following text.
Clone it to a local directory by running the following command.
cd ~/lilian-blog  # Changes to your site directory. Replace "lilian-blog" with your site folder name.
mkdir -p themes  # Creates the "themes" directory.
cd themes  # Changes to the "themes" directory.
git clone https://github.com/kakawait/hugo-tranquilpeak-theme.git tranquilpeak  # Clones the Tranquilpeak theme to the "tranquilpeak" directory.
Step 5: Edit the configuration file
In the root directory of your site folder, open the
config.tomlfile using VS Code.Visual Studio Code (VS Code) is an open-source source code editor developed by Microsoft for Windows, Linux and macOS. I use it almost every day. If you haven’t got it installed, download it here and install it.
Refer to the configuration explanation of your theme and edit the
config.tomlfile according to your need.The
themeconfiguration item is the name of your site theme, which must be the same as the name of the directory that your theme is cloned to. In this example, it istheme = "tranquilpeak".
Step 6: Create a new post
Go to the root directory of your site folder.
cd ~/lilian-blog # "lilian-blog" is the site folder name.Create a new post using the following command.
hugo new post/my-first-post.md # "my-first-post.md" is the file name of the new post. I also created such a file for testing.Edit the newly created post and add some content.
Step 7: Preview your new site
Start the Hugo server using the following command.
hugo server -DPreview your new site at http://localhost:1313/ using a browser.
If you’re satisfied with the preview, move to the next step. If not, edit your post or the
config.tomlfile and preview again.
Step 8: Build your Hugo site
In the root directory of your site folder, run the Hugo command to build your site:
hugo # Builds your Hugo site and writes your static site to the "public" directory by default.
The default Hugo target directory for your built website is
public/. However, you can change this value by specifying a differentpublishDirin your site configuration.
Step 9: Convert your site folder to a Git repository
Go to the
lilian-blog/publicdirectory and initialize the Git repository.cd ~/lilian-blog/public # "public" is the directory where the generated html files are located. It is the folder that will be converted to a Git repository. git init # Initializes the Git repository.Check the files in the
publicdirectory using the following command. You’ll find the.gitfile is added.ls -a # Displays the list with hidden files or directories.
Step 10: Link the local repository to the remote origin
In the
lilian-blog/publicdirectory, add the remote origin for your local Git repository using the following command.git remote add origin git@github.com:lilin90/lilin90.github.io.git # "lilin90/lilin90.github.io.git" indicates "your-github-id/your-github-id.github.io.git".Check the files in the
configfile using the following command.cat .git/config # Displays the config information.The above command returns the following result:
[core]
    repositoryformatversion = 0
    filemode = true
    bare = false
    logallrefupdates = true
    ignorecase = true
    precomposeunicode = true
[remote "origin"]
    url = git@github.com:lilin90/lilin90.github.io.git
    fetch = +refs/heads/*:refs/remotes/origin/*
If the
[remote "origin"]information is displayed, your local Git repository has been successfully linked to the remote origin.
Step 11: Commit your changes to the local Git repository
In the lilian-blog/public directory, run the following command with a commit message that describes what you have changed:
git status  # Shows what you have changed.
git add .  # Adds all modified or newly created files. You can also just add a certain file.
git commit -m "Add a new post"  # "Add a new post" is the commit message.
Step 12: Push your changes to the remote origin
In the lilian-blog/public directory, run the following command to push your changes:
git push -u origin master
Congratulations! Now you've got your customized personal blog! For me, it is at https://lilin90.github.io.
If you want to enforce HTTPS to prevent others from snooping on or tampering with traffic to your site, go to your repository, click Settings and check Enforce HTTPS.
By the way, I bought a domain name https://lilianlee.me and linked it to the original default blog URL. So when you visit https://lilin90.github.io, the page will directly jumps to https://lilianlee.me.
What’s next: add a new post later
To add a new post later, you can just take the following steps:
